SSH & Windows
January 06, 2016
Sometimes getting operating systems to play nice together can be a challenge and more often than not Windows seems like the odd one out. This all comes down to POSIX compatibility. POSIX is an acronym for Portable Operating System Interface and is an API created to provide compatibility between OSes. Linux, BSD, OSX, and even mobile OSes like Android and iOS share a common UNIX lineage and are POSIX-oriented, whereas Windows, based upon the NT kernel, is not.1
There are two ways to go forward, either to install a client which can bridge the gap (ie. PuTTY) or find a way implement POSIX compatibility in Windows (ie. Cygwin or MinGW). If you’re just interested in using SSH go the PuTTY route. If you want to do other ‘UNIX-y’ things in Windows go the POSIX for Windows route.
PuTTY 
PuTTY is simply an SSH client for Windows. While there are others, it is the most widely used by a wide margin, and for good reason. Its configuration can seem a little rough around the edges at first but you can do just about anything with it. Start by downloading a copy of the PuTTY installer from the PuTTY download page.
After you install PuTTY, load it up and you will be presented with the following screen from which you can just type your hostname, click open and enter your credentials when prompted. But you probably want to make you life easier– this guide will explain how to setup a single click login.
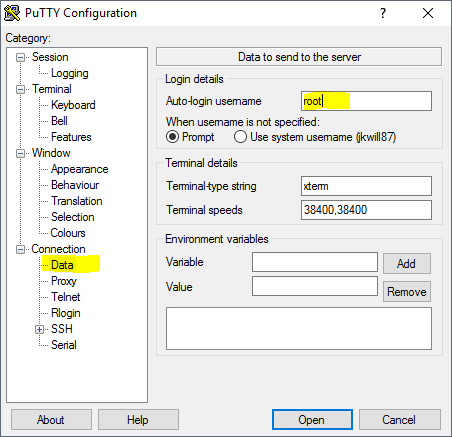
Step 1: Configure Your username
Configuring PuTTY with a username is straight forward enough, just navigate to the Connection > Data field in the Category pane and enter your desired user name in the ‘auto-login username’ field. Now, if your Windows username is the same as your *NIX one you can skip this step.
Step 2: Create a Public/Private Key pair
As far as authentication is concerned, SSH uses one of two methods, either by providing a username and password or by using a using a username and public/private key pair; PuTTY uses the latter. I could (and may even) write an entire post on public-key cryptography, but all you would really need to know to proceed is that this is secure means of authentication and that you should keep your private key, well, private and protected from others.
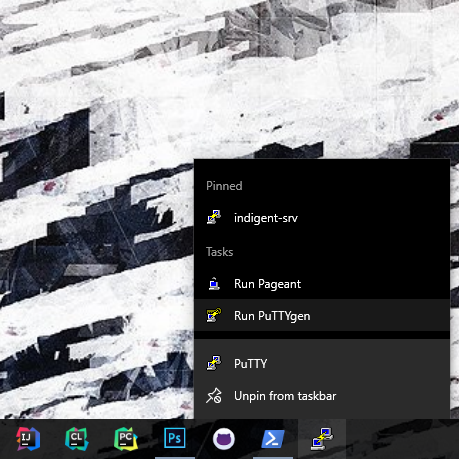
PuTTY comes with a tool called ‘puttygen.exe’ which can make a key pair for you. Its included in the installation or directory and can easily be opened by right clicking the PuTTY icon in either the Start menu or taskbar in Windows 8+.
Okay, so next just click Generate, and then swirl your mouse around until the bar fills up. Save your private key somewhere secure and then copy the text in the Public key box. If you lose your public key you can just reopen your private key within puttygen to generate it– no big deal.
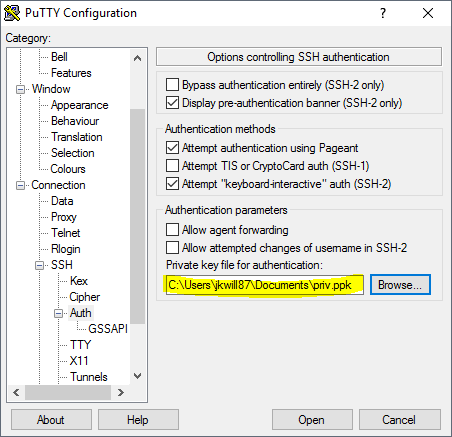
Switching back to PuTTY, navigate to Connection > SSH > Auth and open your saved private key.
Step 3: Copy Your Public Key on the Remote System
We’re in the home stretch now. Go ahead and connect to the remote machine from clicking on the ‘Open’ button from the PuTTY window. A terminal window will pop-up notifying you that the server refused your key, that’s because we haven’t added it yet. Go ahead and enter your password and press enter to login.
Navigate co your ‘~/.ssh/’ and add use your favourite editor, like vim or nano to add your pubkey to the authorized_keys file.
Note: I can publically display my pubkeys– as their names imply they contain no sensitive information.
Thats it, you’re done! All you have to do now is save all your hard work.
Step 4: Save Your Profile
While you may have ended your session, hopefully you haven’t closed PuTTY yet! All you have to do is enter a name for your setup in the ‘Saved Sessions’ text box and click save.
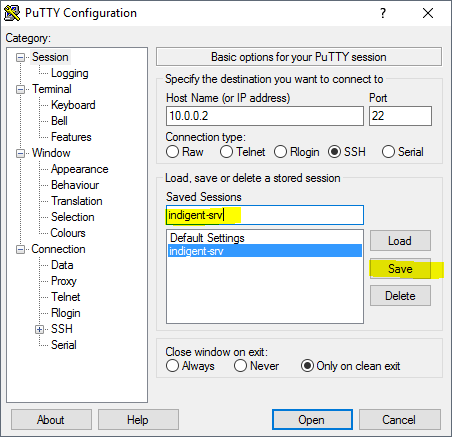
Your session will also conveniently be included in the context window for Windows 8+ as depicted in Step 2.
POSIX for Windows
So if the main barrier to SSH is POSIX incompatibility, it would seem like somehow making Windows POSIX compatible would seem like a reasonable solution. POSIX isn’t just about how OSes communicate using external interfaces, but also defines standard interfaces to interact with subsystems internally. Long story short, by following the standard you can compile source code written for one POSIX system on another one with little to no modification. The implication of implementing POSIX in Windows is that not only can you treat Windows like UNIX, but instead of using some external SSH client or server, you can actually install OpenSSH, the same application that you would use on Linux, OSX, BSD, etc., as well as other *NIX applications like bash, ls, cat, and vi.
Cygwin 
Cygwin acts as a compatibility layer between POSIX applications and Windows. Installing Cygwin is almost like installing a Linux distro on top of Windows, and it has a repository of applications which can be easily installed. Programs are compiled for Cygwin and those programs will work in Windows. When you open Cygwin you are dropped into a bash shell, which will be comfortable for Linux and OSX users.
MinGW 
MinGW is a bit more barebones than Cygwin and really is just a Windows port of the GNU compiler tools which includes things like OpenSSH, GCC, Make, and Bash. It allows you to compile code POSIX applications on Windows for Windows with no compatibility or emulation layer between the two.